Today we'll look at retrieving current users' Information as well as naming the infopath files using the fields on the form.
for the sake of length, I'll divide this post in two part.
In this part, we'll see how to get current users' profile properties in Infopath Browser forms using UserProfileService.asmx
Let's consider an example called Product Request Form where a particular sales employee of the company request for shipment of a particular product
1. First Open the Infopath( this can be done by simply typing 'infopath' in run prompt) and choose a blank template to start with. Make sure you have selected Enable Browser Compatible Features only
2. Add Following Fields to the Main Data source

products: Text
expectedDate: Date
CurrentUserName: Text
IsFormLocked: Boolean
fileName: Text
Error: Text
3. Create the form Layout as below:

Lets insert Some values in the products dropdown:
4. Firstly, we have to get the Current user's name in the Requesting User text box
and the text box be read-only. For this, we will consume the SharePoints' much hyped userprofileservice.asmx's method called GetUserProfileByName
5. For this, go to Design Task -> Data Source -> Manage Data Connections -> Add...
In the Wizard:
a. Choose Create a new connection to: Receive data
b. from the Source of Data, select Web Service
c. In Url, enter your Sites' url follwed by _vti_bin/UserProfileService.asmx

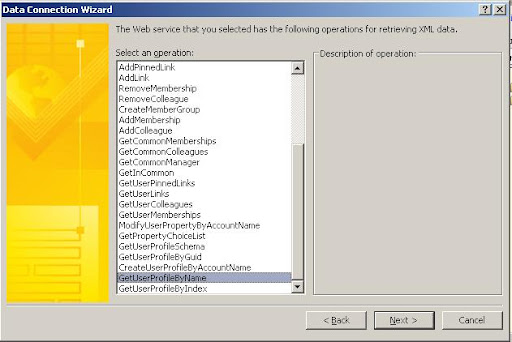
d. Out of the list of methods, choose GetUserProfileByName
e. In Next screen, you'll be asked for Account Name, leave it blank as doing so would get the current User.
f. Make sure in consecutive screens that Store a copy of the data in the form template is unchecked and Automatically retrieve data when form is open is checked
6. In the text box mapped to the field CurrentUserName, we would need to format the display value to that retrieved from UserProfileService.asmx
thats configured to populate its values on form Load. For this, go to Textbox's properties and in the Value field, go to formula builder by clicking fx

7. Click Insert Field or Group.... Choose the secondary receive data source we just created and select value field but don't click Ok yet!!
8. Instead, click on Filter Data... -> Add... to open the filter condition dialog and choose Select a field or group...

9. Choose Name Field again from the Secondary Data Source just created:
10. In the second drop down, select is equal to and in the value drop down, choose Type a Text... and type AccountName
Note: you can choose from a list of profile properties you want:
UserProfile_GUID
AccountName
FirstName
LastName
PreferredName
WorkPhone
Office
Department
Title
Manager
AboutMe
PersonalSpace
PictureURL
UserName
QuickLinks
WebSite
PublicSiteRedirect
SPS-Dotted-line
SPS-Peers
SPS-Responsibility
SPS-Skills
SPS-PastProjects
SPS-Interests
SPS-School
SPS-SipAddress
SPS-Birthday
SPS-MySiteUpgrade
SPS-DontSuggestList
SPS-ProxyAddresses
SPS-HireDate
SPS-LastColleagueAdded
SPS-OWAUrl
SPS-ResourceAccountName
SPS-MasterAccountName
Assistant
WorkEmail
CellPhone
Fax
HomePhone
11. Finally, your formula should look something like this:
12. I Guess, this is it, for getting the current users' loginName.. you could have opted for any properties from the list of available properties above.
In this post, we'll see how to save the Infopath Form in Library with a predefined file name formed from the fields. In our case, we'll have it is:
productName_ExpectedDate_CurrentUser
1. So, lets get back to our ProductRequestForm.xsn:

2. In browser forms by default, we have the options on the top to Save, Save As.., Update, PrintView,etc:
When you say Save, it gives you a pop for file name:
This is something you dont want if you are to save the file with predefined name.
3. In the Infopath Form (in design mode), Go to Tools -> Form Options -> Browser and uncheck Show toolbar at top of form and Show toolbar at bottom of form and check refresh the form before submitting it if form data might change during processing
4. Now we'll come on the Save and Cancel buttons we'd put on the form before. What we want here is on click of the save button, we want the file to be saved with the format as mentioned by concatenating the form field Data. For this we had to write some rules. Before that, we'll create a Submit Data Connection. Go to Design Tasks -> Data Source -> Manage Data Connections... -> Add... to open the Data Connection Wizard.
a. Choose Create a new connection to: Submit data

b. From Destination, choose To a document library on a Sharepoint site
c. Here, Enter the full Library URL and click on the formula builder: 'fx' button and from the Main data source, choose filename field
d. Name your connection as SetFileNameSubmit and click Finish to have the submit connection ready.

5. Now we'll come on to Save button and set some Rules.
Right Click the Save Button -> Button Properties... -> Rules -> Add..., give a name for the rule, say, SaveFileName and click Set Condition... to open a Condition Filter Dialog and set the query as below:
This is to ensure that the user has entered the right values before the save could proceed. As can be seen, if any of the one query is not satisfied, the save button wont proceed
6. Now, if everything is fine and the query is fulfilled, then we would like to add the Save form and close action. However, before this could be done, if you remember, we had just made a Submit data source and had chosen fileName field to be the name of the file. But for this, there has to be some value in that field before it could be used as a fileName.
Lets go ahead and add a Set a field's value action.

In "Field:" text box, select fileName field from the Main data Source and in "Value:" text box, choose the 'fx' (formula builder). Enter a formula to concatenate the fields' values:
concat(products,"_",expectedDate,"_",CurrentUserName) like this:

NOTE: the Underlined field are result of select from Insert Field or Group... from Main Data Source
7. Click Ok, to come back on the main Rule Dialog. Now there is a catch here that has different ways of going about. When we save the form, its all ok and the form is saved with desired name. But if someone reopens the form and change the values of the fields involved in file naming, infopath is not intelligent enough to understand this and rename the file. Instead, it creates a new copy with newer values. For this:
a. Either we lock the fields that are dynamically forming the fileName on the first Virgin Save so that the consequent modifications ensures that these fields are not changed and hence the file name.
OR
b. We knock off the old file through Querying with CAML either in Library's Item Event Handlers or some other place that you find more feasible.
I choose to lock the fields after the file is saved and hence we created a field in the Main data source called IsFormLocked. We'll go ahead and set this field value to TRUE or 1 and then set Conditional Formatting on the controls to disable on open if they found value of this field as TRUE or 1. This will ensure that the values are never changed
8. Now add two more Actions to
a. Submit using a Data Connection and choose SetFileNameSubmit connection we just created.
9. Finally add an action called Close the Form.
Your action list for this rule should look something like this:
10. Also set simple Close the form action for Cancel Button.
11. Now, in each of the controls'properties (those involved in setting the file name), set a Right Click the Control -> Conditional Formatting... -> Add... -> , set a Query like below to disable the control:

you would need to repeat this for controls mapped to each of these:products, expectedDate, CurrentUserName.
NOTE: for textbox and Datepicker, it would be read-Only
12. Also, if you rememeber, we had also made a section that had an error message in Red, we'll show this section when Button Save Query is not fullfiled. Or in other words, hide the control when Query is fulfilled.

13. For this go to the Section, Right Click -> Conditional Formatting... -> Add... and set the following query and select Hide this Control:
14. Now click on the Design Task -> Design Checker to see if there is any error. you might see one message saying Data connection contains parameterized query. Well, its nothing. its only saying that one of your receive connections needs a parameter and if you still remember, its the one that consumes UserProfileService.asmx
15. Now, i guess, we are good to go. Save the form and Publish it to SharePoint Library. I published it to a new document Library called Product Request Form Libary. You can do it to an existing library also. In any case, make sure the library is same as the one you entered in the textbox in the create new submit data connection wizard. The submit connection that we named here as SetFileNameSubmit
NOTE: Make sure that in Settings -> Form Library Settings -> Advanced Settings in Browser-enabled Documents section, Display as a web page is selected.
16. Now create a new Form item:
17. You'd see form open in browser like this:
fill in the appropiate details and see the error message go away.
18. Finally when you click save, you'd see the form item with the file name in the desired format as below:

So, in these two post, we saw how can we get current users' identity when form opens and also, how to give you form, a predefined file name.
for the sake of length, I'll divide this post in two part.
In this part, we'll see how to get current users' profile properties in Infopath Browser forms using UserProfileService.asmx
Let's consider an example called Product Request Form where a particular sales employee of the company request for shipment of a particular product
1. First Open the Infopath( this can be done by simply typing 'infopath' in run prompt) and choose a blank template to start with. Make sure you have selected Enable Browser Compatible Features only
2. Add Following Fields to the Main Data source
products: Text
expectedDate: Date
CurrentUserName: Text
IsFormLocked: Boolean
fileName: Text
Error: Text
3. Create the form Layout as below:
Lets insert Some values in the products dropdown:
4. Firstly, we have to get the Current user's name in the Requesting User text box
and the text box be read-only. For this, we will consume the SharePoints' much hyped userprofileservice.asmx's method called GetUserProfileByName
5. For this, go to Design Task -> Data Source -> Manage Data Connections -> Add...
In the Wizard:
a. Choose Create a new connection to: Receive data
b. from the Source of Data, select Web Service
c. In Url, enter your Sites' url follwed by _vti_bin/UserProfileService.asmx
d. Out of the list of methods, choose GetUserProfileByName
e. In Next screen, you'll be asked for Account Name, leave it blank as doing so would get the current User.
f. Make sure in consecutive screens that Store a copy of the data in the form template is unchecked and Automatically retrieve data when form is open is checked
6. In the text box mapped to the field CurrentUserName, we would need to format the display value to that retrieved from UserProfileService.asmx
thats configured to populate its values on form Load. For this, go to Textbox's properties and in the Value field, go to formula builder by clicking fx
7. Click Insert Field or Group.... Choose the secondary receive data source we just created and select value field but don't click Ok yet!!
8. Instead, click on Filter Data... -> Add... to open the filter condition dialog and choose Select a field or group...
9. Choose Name Field again from the Secondary Data Source just created:
10. In the second drop down, select is equal to and in the value drop down, choose Type a Text... and type AccountName
Note: you can choose from a list of profile properties you want:
UserProfile_GUID
AccountName
FirstName
LastName
PreferredName
WorkPhone
Office
Department
Title
Manager
AboutMe
PersonalSpace
PictureURL
UserName
QuickLinks
WebSite
PublicSiteRedirect
SPS-Dotted-line
SPS-Peers
SPS-Responsibility
SPS-Skills
SPS-PastProjects
SPS-Interests
SPS-School
SPS-SipAddress
SPS-Birthday
SPS-MySiteUpgrade
SPS-DontSuggestList
SPS-ProxyAddresses
SPS-HireDate
SPS-LastColleagueAdded
SPS-OWAUrl
SPS-ResourceAccountName
SPS-MasterAccountName
Assistant
WorkEmail
CellPhone
Fax
HomePhone
11. Finally, your formula should look something like this:
12. I Guess, this is it, for getting the current users' loginName.. you could have opted for any properties from the list of available properties above.
In this post, we'll see how to save the Infopath Form in Library with a predefined file name formed from the fields. In our case, we'll have it is:
productName_ExpectedDate_CurrentUser
1. So, lets get back to our ProductRequestForm.xsn:
2. In browser forms by default, we have the options on the top to Save, Save As.., Update, PrintView,etc:
When you say Save, it gives you a pop for file name:
This is something you dont want if you are to save the file with predefined name.
3. In the Infopath Form (in design mode), Go to Tools -> Form Options -> Browser and uncheck Show toolbar at top of form and Show toolbar at bottom of form and check refresh the form before submitting it if form data might change during processing
4. Now we'll come on the Save and Cancel buttons we'd put on the form before. What we want here is on click of the save button, we want the file to be saved with the format as mentioned by concatenating the form field Data. For this we had to write some rules. Before that, we'll create a Submit Data Connection. Go to Design Tasks -> Data Source -> Manage Data Connections... -> Add... to open the Data Connection Wizard.
a. Choose Create a new connection to: Submit data
b. From Destination, choose To a document library on a Sharepoint site
c. Here, Enter the full Library URL and click on the formula builder: 'fx' button and from the Main data source, choose filename field
d. Name your connection as SetFileNameSubmit and click Finish to have the submit connection ready.
5. Now we'll come on to Save button and set some Rules.
Right Click the Save Button -> Button Properties... -> Rules -> Add..., give a name for the rule, say, SaveFileName and click Set Condition... to open a Condition Filter Dialog and set the query as below:
This is to ensure that the user has entered the right values before the save could proceed. As can be seen, if any of the one query is not satisfied, the save button wont proceed
6. Now, if everything is fine and the query is fulfilled, then we would like to add the Save form and close action. However, before this could be done, if you remember, we had just made a Submit data source and had chosen fileName field to be the name of the file. But for this, there has to be some value in that field before it could be used as a fileName.
Lets go ahead and add a Set a field's value action.
In "Field:" text box, select fileName field from the Main data Source and in "Value:" text box, choose the 'fx' (formula builder). Enter a formula to concatenate the fields' values:
concat(products,"_",expectedDate,"_",CurrentUserName) like this:
NOTE: the Underlined field are result of select from Insert Field or Group... from Main Data Source
7. Click Ok, to come back on the main Rule Dialog. Now there is a catch here that has different ways of going about. When we save the form, its all ok and the form is saved with desired name. But if someone reopens the form and change the values of the fields involved in file naming, infopath is not intelligent enough to understand this and rename the file. Instead, it creates a new copy with newer values. For this:
a. Either we lock the fields that are dynamically forming the fileName on the first Virgin Save so that the consequent modifications ensures that these fields are not changed and hence the file name.
OR
b. We knock off the old file through Querying with CAML either in Library's Item Event Handlers or some other place that you find more feasible.
I choose to lock the fields after the file is saved and hence we created a field in the Main data source called IsFormLocked. We'll go ahead and set this field value to TRUE or 1 and then set Conditional Formatting on the controls to disable on open if they found value of this field as TRUE or 1. This will ensure that the values are never changed
8. Now add two more Actions to
a. Submit using a Data Connection and choose SetFileNameSubmit connection we just created.
9. Finally add an action called Close the Form.
Your action list for this rule should look something like this:
10. Also set simple Close the form action for Cancel Button.
11. Now, in each of the controls'properties (those involved in setting the file name), set a Right Click the Control -> Conditional Formatting... -> Add... -> , set a Query like below to disable the control:
you would need to repeat this for controls mapped to each of these:products, expectedDate, CurrentUserName.
NOTE: for textbox and Datepicker, it would be read-Only
12. Also, if you rememeber, we had also made a section that had an error message in Red, we'll show this section when Button Save Query is not fullfiled. Or in other words, hide the control when Query is fulfilled.
13. For this go to the Section, Right Click -> Conditional Formatting... -> Add... and set the following query and select Hide this Control:
14. Now click on the Design Task -> Design Checker to see if there is any error. you might see one message saying Data connection contains parameterized query. Well, its nothing. its only saying that one of your receive connections needs a parameter and if you still remember, its the one that consumes UserProfileService.asmx
15. Now, i guess, we are good to go. Save the form and Publish it to SharePoint Library. I published it to a new document Library called Product Request Form Libary. You can do it to an existing library also. In any case, make sure the library is same as the one you entered in the textbox in the create new submit data connection wizard. The submit connection that we named here as SetFileNameSubmit
NOTE: Make sure that in Settings -> Form Library Settings -> Advanced Settings in Browser-enabled Documents section, Display as a web page is selected.
16. Now create a new Form item:
17. You'd see form open in browser like this:
fill in the appropiate details and see the error message go away.
18. Finally when you click save, you'd see the form item with the file name in the desired format as below:
So, in these two post, we saw how can we get current users' identity when form opens and also, how to give you form, a predefined file name.
No comments:
Post a Comment